

This DIY might not solve every problem...but it'll definitely help make life simpler!
I always struggle to find the right laundry basket; they are always too bulky, too small, or just not that pretty. When we lived in an apartment, our closet was tiny, so our huge laundry basket always made life interesting - annoying. Once we moved into our home, our closet size was no longer an issue, but I still fought with our basket since it is bulky and, weirdly enough, always in the way when I am in a rush.
I saw a couple of "laundry systems" as they were called online, and I immediately visualized this DIY. It was easy, fast, and oh-so-simple!
For this project, you need:
- A baseboard
- Dowels or hooks
- Paint or stain
- Canvas laundry bags
- 1" curtain grommets
- Scissors
- Screwdriver & screws
- Stud finder or wall anchors
I found our laundry bags on Amazon, a pack of 4 for around $17, and the curtain grommets for about $9. You can definitely look in local stores or your preferred online retailer. Just make sure you double-check sizing!
I measured up the space where I wanted to place it and based on that, I cut the baseboard. Using a little dreaded math calculations, I got the dowel placements. I used dowels, but you can totally replace dowels with some hooks (and to be honest, I think hooks will make it easier). To finish it off, I used the same color as our walls to paint it, I still had some at home, but you could also use acrylic paint if you don't need it to match your wall or even some stain to make the wood grain be a little accent. After this, I moved on to the actual laundry bags.

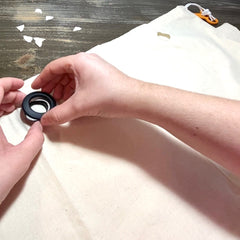
Most grommets come with the little circle stencil to help you cut; one thing that I absolutely recommend is making sure you cut on the smaller side of that stencil. Make sure you have more fabric to work with so that the grommets can actually hold on to the canvas bags, even when they are full.


I left about a foot in between each hole; this should be almost the same distance between your dowels/hooks. Once you have cut the circles in your canvas bags, it's time to place the grommets. You can add some fabric glue to prevent any future tears; this is not a necessary step.
Repeat this step with however many bags you are using; I used three since I usually separate our laundry in darks, lights, and color.
And that's it for the crafty stuff; now it is time to secure it to the wall, and you are done! Easy right?
Find the studs, if any, in the designated space. If you can't find them, mark up where the screws are going and put up some wall anchors.

I was lucky enough to find two studs, so I secured the baseboard and added the bags. I love how it turned out and how practical it is. This "laundry system," as the internet called it, is in our master closet. Now on laundry days, I grab one bag at a time and take it from there.


I hope you feel inspired by how many times I say this will make your life simpler and GET. TO. DIY!
Share your projects with us. We love to see them!